Modifying PowerPlans
2012
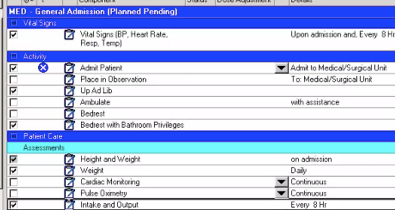
In this demonstration you learn how to modify a PowerPlan by adding additional orders.
Prior to clicking Orders for Signature, additional orders can be added to a plan manually if necessary and customized to fit your patient’s need.
To add an order to the plan,
1. Click Add to Phase on the plan toolbar located above the selected PowerPlan.
2. Select Add Order.
The Add Order window opens.
Use the search function to locate the order for Clear Liquid Diabetic Diet. You can only add individual orders to a PowerPlan, you cannot add another PowerPlan to a PowerPlan.
3. Enter diabetic in the Find box.
The matching results are listed in the Add Order window.
4. Select Clear Liquid Diabetic Diet to add the order to the General Admission PowerPlan
Let’s add a CBC order as well.
-
5.Enter CBC in the find box.
-
6.Select it.
-
7.Click Done to close the Add Order window
You have successfully added two individual orders to the General Admission PowerPlan under Diet and Laboratory categories.
Note: If the orders had been added through the Add button they would have still been placed, but not appear in the body of the plan.
After the modifications and additions are complete and you are satisfied with the details of the PowerPlan you are ready to sign it. Before signing the plan, it is a good habit to review all the orders on the Orders window.
6. Click Orders for Signature.
All the selected orders are placed on the scratch pad for your final review in an Initiated Pending status. Here you can continue to modify and make changes to the plan prior to clicking the Sign button.
You decide you do not want to order a CBC for your patient. While on the scratch pad.
7. Find the CBC order under the Laboratory clinical category.
8. Right-click the order.
9. Select Remove.
The CBC order is removed from the scratch pad and will not be part of this ordering event.
NOTE: If you decide to terminate placing the chosen PowerPlan on the patient’s chart, you can click Refresh if you have not already signed the orders. The Order Services window opens giving you the option to cancel your actions.
For today’s practice, you will continue with signing this PowerPlan. Once you are ready to communicate the orders to the appropriate departments (such as Nursing and Dietary),
10. Click Sign.
It is a recommended practice to refresh the screen after signing orders and plans. This allows all users system wide to view the most current charting.
11. Click Refresh.
After clicking Refresh, make sure your screen returns to the Orders Profile.
12. Click the Orders header on the Orders Navigator.
The plan is in an Initiated status, and the individual orders that comprise the plan (represented by the Initiated icon) move to an Ordered status and are communicated to the appropriate departments electronically.
You have completed this demonstration; please click Next to proceed to the next lesson.
15 Add to Plan
9:13 PM
PowerPlan offers comprehensive care planning, coordination, and patient management, within a centralized approach.

