Basic Navigation
2012
In this overview, you learn how to navigate the patient’s chart.
As a physician, after you log onto PowerChart you are presented with Message Center.
For this demonstration purpose, we will select a patient off of the defaulted location list.
Clicking the Patient List button from the PowerChart toolbar will change your view to display your Patient list.
From the Location list, double-click to open a patient’s chart.
If prompted in the Assign Relationship dialog box, select your relationship to the patient and click OK. If you are the attending, your relationship will already be declared. If you have not been attached to the patient, you only establish relationship once for the entire patient visit.
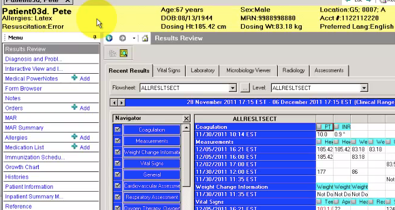
The demographics bar is the colored band at the top of the patient’s chart. It contains the patient’s demographic information, such as name and age. Three shortcuts to additional information are available from the demographics bar: Name, Allergy, and Location hyperlink.
1. Click the patient’s name to view additional demographic information.
2. Click OK to return to the chart.
Existing allergies display in the demographic bar. If the patient does not have any allergies recorded, Allergies Not Recorded displays. If the patient has no known allergies (NKA), the Allergy List box displays No Known Allergies. Right-clicking the allergy allows modification to easily enter further information learned from the patient. For example codeine only causes nausea. Allergies are displayed based on the defined severity highest to lowest. Allergies with the same severity are listed in alphabetical order.
Located on the left side of the open chart is the Menu. The Menu serves as the navigator for the chart sections. The right side of the open chart displays the selected menu section’s data. Located in the upper-right hand corner of the menu is a push pin icon. Click the push pin icon once to hide the Menu, giving you more space to view the selected menu section. Hover over the Menu tab to bring it back into view. With the menu expanded, click the push pin icon to keep the Menu open.
The patient’s chart opens to the Results View menu section.
The Results View menu shows all clinical information recorded for a patient. and allows qualified healthcare professionals to enter information directly to the patients chart. Information is shown in a spreadsheet with flexible display features that make it possible to create an optimal view.
Diagnosis and problems is where you can view problems and diagnoses in the same window. You can add and update problems or diagnoses or both. You can create advanced filters to display problems for which you alone are responsible.
Medical Powernotes are used for documenting the healthcare encounter and creating an electronic record of that encounter. Using PowerNote, you can complete an entire patient encounter, including reviewing results, writing documentation, assigning a diagnosis, and initiating a plan of care.
Use Form Browser for a convenient way to view the complete details of any charting that has been completed using forms. The user can see the charted information in its entirety and is better able to view related items.
The Notes band allows clinicians to view and enter textual information that is stored in the patient’s chart. Authorized individuals can enter clinical documents into the system. Scanned documents can also be entered into the system. Documentation entered into the system by any valid means is available instantly to all providers who have privileges to view documents.
The Orders tab is used to place, view, modify, cancel, and generally work with various types of orders.
Clinicians need a view of the medication administration record (MAR) to see more medication information, including both pending and given administrations, more concisely. The Therapeutic Class navigator band lists the Multum® therapeutic classes of the medications that are pending or have been administered within that timeframe selected.
The Inpatient Summary provides a snapshot of the activity and actions taken on the patient. This summary pulls data from several sections of the chart into one comprehensive view. Physicians can use this view as a tool to assist the navigation of the patient’s chart by clicking the section headers.
For example, when you click the Allergies header from the Inpatient Summary, the chart opens you to the Allergies menu section where you can review details, add additional allergies, and perform a reverse allergy check.
Refreshing will allow new data to populate that has been charted by another user. The As Of button reflects the time that has elapsed since the selected menu section was last refreshed. Clicking the Last Refresh button refreshes and updates all the data in view.
On the navigator, click the arrows to move you through the menu sections or click the home icon to return you to the Inpatient Summary.
Clicking the back button will return you to the previous page you were viewing. In this scenario selecting the back button twice returns you to the Inpatient Summary.
As we have discussed, the Inpatient Summary provides a snapshot of the activity and actions taken on a patient. This summary pulls data from several sections of the chart into this one comprehensive view. Physicians can use this view as a tool to assist the navigation of the patient’s chart by clicking the section headers.
The Reference Text browser provides a respository of information organized into three sections by tabs: Drug Reference, Education Leaflet, and Reference. For example, the Drug Reference tab contains the Multum content for medications in a format that would normally be used by providers , pharmacists, and other clinicians.
The ICU Summary is similar to the Inpatient summary but is focused on providing a summary of the patient's activities in the ICU. It is to be used for reviewing information regarding the patient’s vitals, medications, orders, and assisting with the hand-off communication process.
The Discharge Planning menu section allows you to efficiently manage the activities associated with the process of documenting and departing a patient. The section serves as a launch pad for depart-related activities. Best practice workflow assesses this section regularly to optimize the discharge process, with most components completed prior to the discharge actually occurring. Attention and receptiveness to discharge instructions are often improved when not performed during the busy discharge process.
Many of the menu sections are pertinent for physician rounding. You will want to explore and customize your views to match your workflow.
You have completed this demonstration; please click Next to proceed to the next lesson.
05 Navigation
11:12 AM
With PowerChart, you get the benefits of a clinical database, with functionality allowing you to view clinical data, complete orders, and optimize clinician documentation in one powerful solution.

